새로 오신 강사님께 학원 전체 반 정보를 다 보여드려야 할까요, 아니면 담당 반만? 상담실장님은 수업은 안 하시는데 상담 기록은 봐야 하는데, 이런 경우는 어떻게 설정해야 할까요?
레이어미디어 학원관리 서비스는 이 질문에 아주 단순하게 답합니다. 등급(직급 표시용)과 실제 접근권한(반 체크리스트 + 도구 체크리스트)을 완전히 분리해뒀습니다. 원장님은 관리자 포털에서 체크박스만 클릭하시면 끝입니다.
핵심 개념 3가지
설정 방법을 보기 전에, 이 구조가 어떻게 동작하는지 딱 세 가지만 알아두시면 됩니다.
- 등급(마스터/매니저/강사/일반)은 화면에 표시되는 직급 라벨일 뿐, 실제로 무엇을 볼 수 있는지와는 무관합니다.
- 볼 수 있는 반은 체크된 반의 학생 정보(출결·성적·숙제·참여도·상담기록 등 전부)만 보인다는 뜻입니다. 체크 안 된 반의 학생은 아예 조회되지 않습니다.
- 쓸 수 있는 도구는 그 직원이 채팅으로 실제 시킬 수 있는 기능 목록입니다. 체크 안 된 기능은 시켜도 처리되지 않습니다.
딱 하나 예외가 있습니다. 마스터(원장) 등급은 체크를 하나도 안 해도 모든 반, 모든 기능에 자동으로 전체 접근합니다.
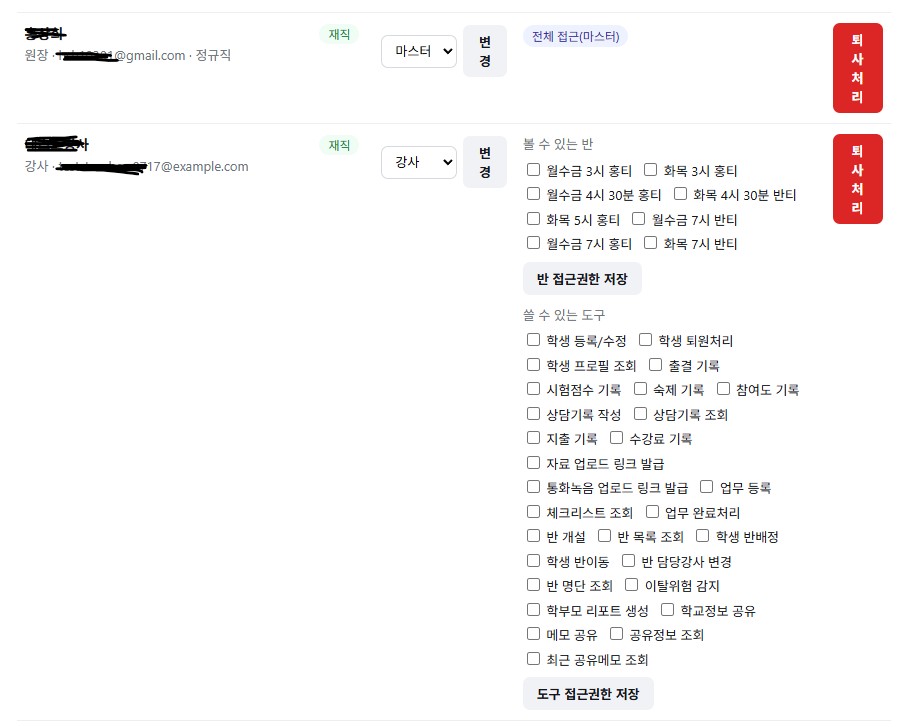
설정 방법
1. 관리자 포털 로그인
이 화면은 마스터(원장) 계정으로만 들어갈 수 있습니다. 강사님, 상담실장님은 이 포털에 로그인하실 필요가 없습니다 – 체크된 기능을 그냥 카카오톡 쓰듯 채팅으로 쓰시면 됩니다.
2. 등급 바꾸기
직원 목록 표에서 등급 드롭다운을 클릭해 마스터/매니저/강사/일반 중 하나를 고르고 “변경” 버튼을 누르면 즉시 반영됩니다. 화면 표시용 라벨이라 부담 없이 바꾸셔도 됩니다.
3. 볼 수 있는 반 체크하기
개설된 반이 전부 체크박스로 나열됩니다. 그 직원이 봐야 할 반만 체크하고 “반 접근권한 저장”을 누르세요. 지금 체크된 상태 그대로가 곧 “이 직원이 지금 볼 수 있는 반”입니다 – 따로 확인할 필요 없이 체크된 박스만 보시면 됩니다.
4. 쓸 수 있는 도구 체크하기
출결 기록, 시험점수 기록, 상담기록 작성처럼 실제 기능 목록이 체크박스로 나열됩니다. 필요한 기능만 체크하고 “도구 접근권한 저장”을 누르세요.
5. 퇴사 처리
더 이상 근무하지 않는 직원은 “퇴사처리” 버튼 한 번으로 즉시 비활성화됩니다. 이후로는 어떤 기능도 쓸 수 없게 됩니다.
실전 팁 — 상담실장님처럼 수업이 없는 직군
상담실장님은 특정 반을 담당하지 않지만 상담 기록은 봐야 합니다. 이럴 때는 반은 하나도 체크하지 않고, “상담기록 작성”·”상담기록 조회”·”학부모 리포트 생성” 같은 도구만 체크하시면 됩니다. 반 체크와 도구 체크는 서로 완전히 독립적이라, 이런 조합도 자유롭게 만드실 수 있습니다.
Should a new teacher see every class in the academy, or only the ones they teach? And what about a counseling lead who doesn’t teach any classes at all, but still needs to see counseling records?
Layer Media’s academy service answers this with two completely separate things: a tier label (just a title shown on screen) and actual access (a class checklist plus a tool checklist). As the director, all you do is click checkboxes in the admin portal.
Three things to understand first
Before the setup steps, here are the three ideas that make this work.
- Tier (Master / Manager / Teacher / General) is just a label shown on screen — it has nothing to do with what someone can actually see.
- Classes they can see means every record tied to students in a checked class (attendance, grades, homework, participation, counseling notes, everything) becomes visible. Students in unchecked classes simply don’t show up at all.
- Tools they can use is the list of actions that staff member can actually ask for in chat. Anything unchecked is refused, even if they ask.
There’s exactly one exception: a Master (director) account automatically has full access to every class and every tool, with nothing checked at all.
How to set it up
1. Log into the admin portal
Only a Master (director) account can access this screen. Teachers and counseling leads never need to log in here — they simply chat, the same way they’d send a KakaoTalk message, using whatever tools are checked for them.
2. Change a tier
In the staff table, click the tier dropdown, pick Master / Manager / Teacher / General, and click “Change” — it applies instantly. Since it’s just a display label, feel free to change it without worry.
3. Check which classes they can see
Every existing class is listed as a checkbox. Check only the classes that staff member should see, then click “Save Class Access.” Whatever is checked right now IS the current answer to “what can this person see” — there’s no separate summary to check, the checkboxes are the summary.
4. Check which tools they can use
Real actions — logging attendance, recording exam scores, writing counseling notes — are listed as checkboxes. Check only what’s needed, then click “Save Tool Access.”
5. Deactivating staff
Anyone no longer working there can be deactivated instantly with a single click on “Deactivate.” From that point on, they can’t use any tool at all.
A practical tip — roles like a counseling lead who doesn’t teach
A counseling lead doesn’t own any class, but still needs to see counseling records. For this, check zero classes, and check only tools like “Write Counseling Notes,” “View Counseling History,” and “Generate Parent Report.” Class access and tool access are completely independent of each other, so combinations like this are entirely possible.