학부모와 통화한 뒤 상담 내용을 다시 손으로 정리하느라 시간을 쓰신 적 있으신가요? 레이어미디어의 통화녹음 텍스트화 서비스를 연결해두면, 스마트폰에 저장된 통화 녹음 파일을 업로드하는 것만으로 대화 내용이 자동으로 텍스트로 변환되어 상담기록으로 저장됩니다. 화자 구분도 함께 제공되어 “원장:”과 “학부모:”가 구분된 형태로 정리됩니다.
왜 학원이 직접 계정을 만들어야 하나요?
학원마다 통화량 차이가 커서, 레이어미디어는 이 기능을 학원이 자신의 명의로 네이버클라우드플랫폼(NCP) 계정을 직접 만들어 사용하는 방식으로 제공합니다. 사용한 만큼만 요금이 발생하고, 학원의 통화 데이터가 레이어미디어의 공용 시스템을 거치지 않고 학원 소유의 계정 안에서만 처리된다는 장점이 있습니다.
다행히 이 설정은 회원가입만으로 바로 시작할 수 있습니다. 별도의 본인인증 심사나 대기 시간이 없어서, 오늘 가입해서 오늘 바로 설정을 마칠 수 있습니다.
설정 절차
1. 네이버클라우드플랫폼 가입
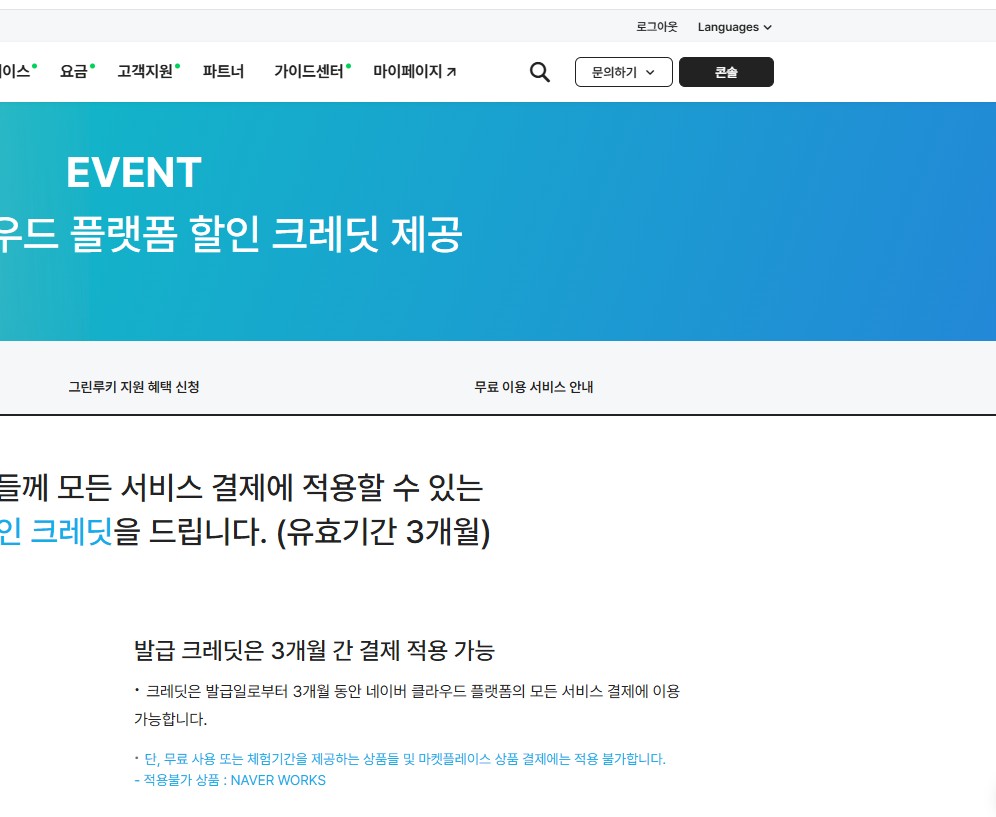
ncloud.com에서 회원가입 후 결제수단을 등록합니다. 신규 가입 시 할인 크레딧을 제공하는 이벤트가 진행 중일 때도 있으니, 콘솔 상단의 이벤트 배너를 한 번 확인해보시는 것도 좋습니다.
2. API 인증키 발급받기
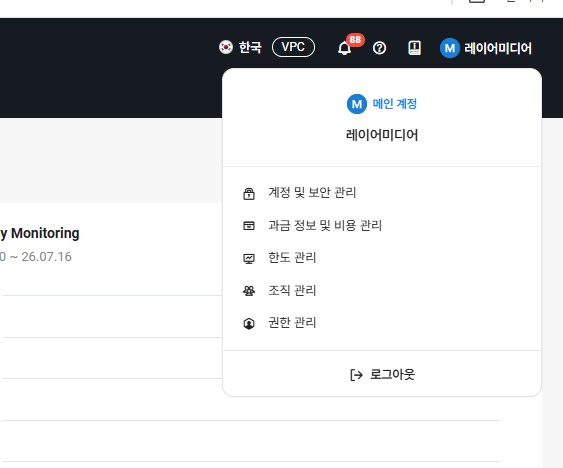
로그인 후 우측 상단의 계정 메뉴를 클릭하고 “계정 및 보안 관리”를 선택합니다.
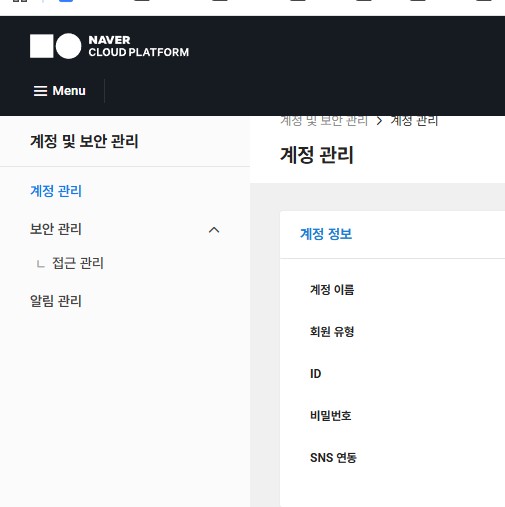
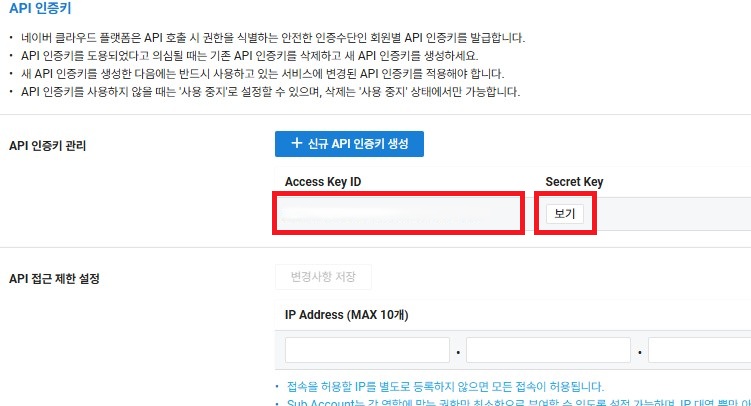
왼쪽 메뉴에서 보안 관리 > 접근 관리로 들어간 뒤, API 인증키 관리 화면에서 “신규 API 인증키 생성” 버튼을 눌러 Access Key ID와 Secret Key를 발급받습니다.
3. Object Storage 버킷 생성
상단 메뉴에서 Storage > Object Storage로 이동해 새 버킷을 하나 생성합니다. 이 버킷은 다음 단계에서 CLOVA Speech 도메인을 만들 때 인식 대상 파일과 결과 파일을 저장할 경로로 사용됩니다.
4. CLOVA Speech 서비스 찾기
왼쪽 상단의 Menu를 클릭하고 AI Services 카테고리에서 CLOVA Speech를 선택합니다.
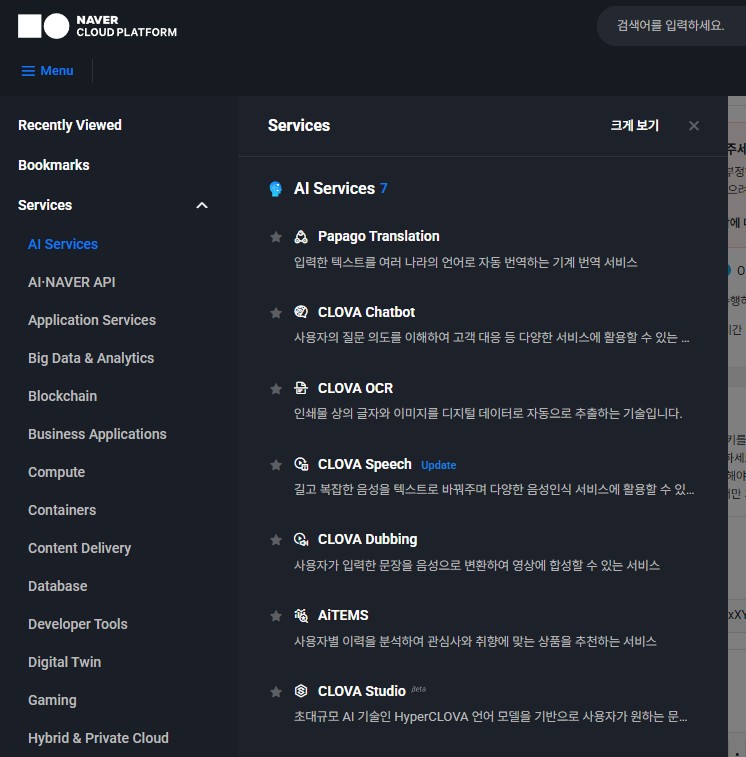
5. 도메인 생성
CLOVA Speech의 Domain 메뉴에서 “+ 도메인 생성” 버튼을 누릅니다.
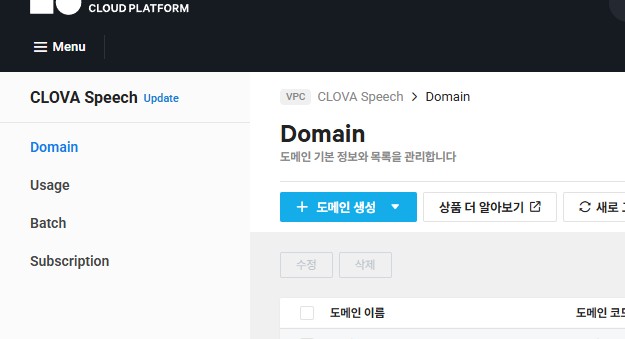
“장문 인식 도메인 생성” 화면에서 아래 항목을 입력합니다.
- 도메인 이름 / 도메인 코드: 학원을 알아보기 쉬운 이름으로 지정 (영문 시작)
- 서비스 플랜: Basic (사용량에 따라 과금)
- 추가 기능: 화자 인식 “사용”으로 설정 (원장/학부모 구분을 위해 필요)
- Storage 설정: 3번에서 만든 Object Storage 버킷 경로를 인식 대상 저장 경로 / 결과 파일 저장 경로에 각각 입력
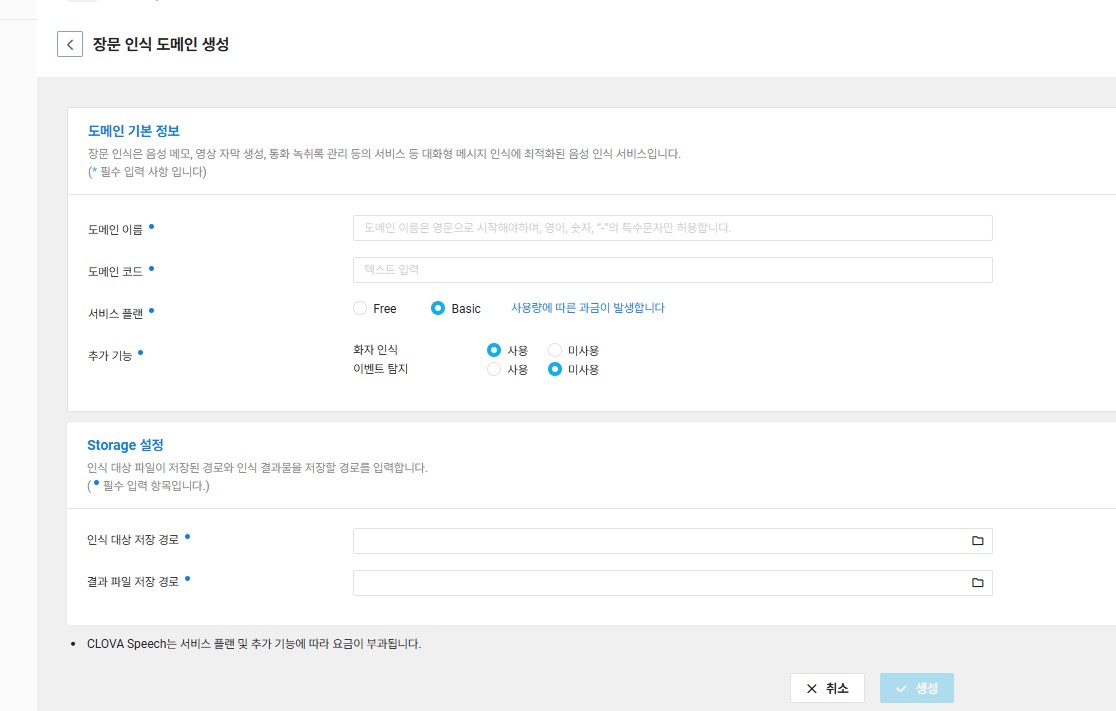
입력을 마치고 “생성”을 누르면 도메인 목록에 방금 만든 도메인이 나타납니다.
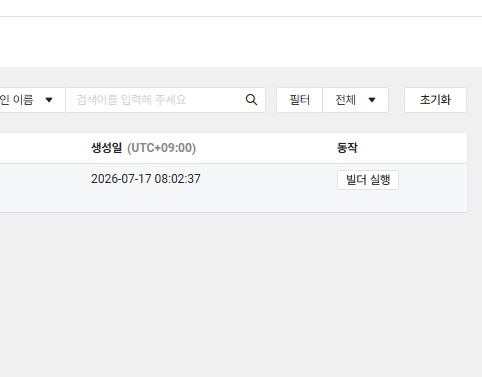
6. 연동 정보 확인하기
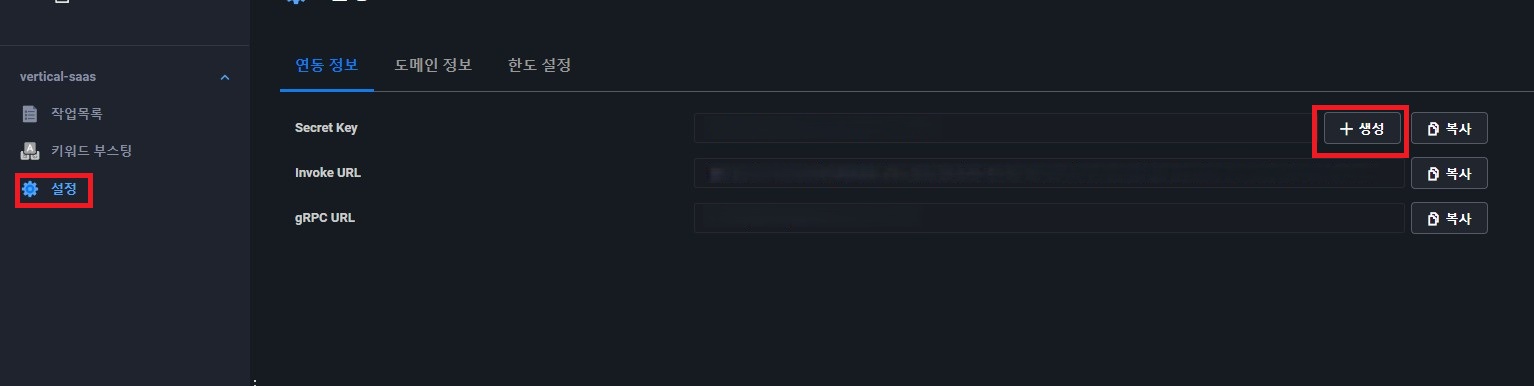
생성된 도메인을 클릭해 들어간 뒤, 설정 > 연동 정보 탭으로 이동합니다. 여기서 “생성” 버튼을 눌러 도메인 전용 Secret Key를 발급받고, Invoke URL을 확인합니다.
7. 레이어미디어 관리자 포털에 입력하기
지금까지 발급받은 아래 값들을 레이어미디어 관리자 포털의 설정 화면에 입력하면 연결이 완료됩니다.
- Access Key ID / Secret Key (2번 단계)
- Object Storage 버킷 경로 (3번 단계)
- CLOVA Speech 도메인 Secret Key / Invoke URL (6번 단계)
같은 원리로 동작하는 학부모 메시지 발송 기능은 카카오·통신사 심사 때문에 준비까지 1~2주 정도 걸릴 수 있지만, 통화녹음 텍스트화는 NCP 가입이 즉시 완료되기 때문에 오늘 시작하면 오늘 안에 설정을 마칠 수 있습니다.
Ever spent extra time after a parent call rewriting what was said, just to keep a record? Once you connect Layer Media’s Call Transcription service, uploading a call recording from your phone is all it takes — the conversation is automatically converted to text and saved as a counseling record, with speakers labeled separately (e.g. “Director:” and “Parent:”).
Why does the academy need its own account?
Call volume varies a lot from one academy to another, so Layer Media provides this feature through a model where each academy creates its own NAVER Cloud Platform (NCP) account and uses it directly. You’re billed only for what you actually use, and your call data is processed entirely within your own account rather than passing through any shared system.
The good news: this setup can start the moment you sign up. There’s no identity-verification review or waiting period, so you can register today and finish the whole setup the same day.
Setup Steps
1. Sign up for NAVER Cloud Platform
Create an account at ncloud.com and register a payment method. NCP occasionally runs promotions offering free usage credit for new accounts, so it’s worth checking the event banner at the top of the console.
2. Issue your API authentication keys
After logging in, click the account menu in the top-right corner and select “Account & Security Management.”
From the left sidebar, go to Security Management > Access Management, then on the API Authentication Key Management screen, click “+ Create New API Authentication Key” to issue an Access Key ID and Secret Key.
3. Create an Object Storage bucket
Go to Storage > Object Storage in the top menu and create a new bucket. This bucket will be used as the path for both the input recordings and the output transcript files when you create the CLOVA Speech domain in the next step.
4. Find the CLOVA Speech service
Click Menu in the top-left corner, then select CLOVA Speech under the AI Services category.
5. Create a domain
On the CLOVA Speech Domain page, click “+ Create Domain.”
On the “Create Long-form Recognition Domain” screen, fill in the following:
- Domain Name / Domain Code: something easy to recognize as your academy (must start with a letter)
- Service Plan: Basic (billed by usage)
- Additional Features: set Speaker Recognition to “Enabled” (needed to separate director/parent speech)
- Storage Settings: enter the Object Storage bucket path from Step 3 for both the input path and the output path
Once submitted, your new domain will appear in the domain list.
6. Get your connection details
Click into the domain you just created, then go to the Settings > Connection Info tab. Click “Create” to issue a domain-specific Secret Key, and note the Invoke URL.
7. Enter everything into the Layer Media admin portal
Enter the values you’ve gathered into the settings screen of the Layer Media admin portal, and the connection is complete:
- Access Key ID / Secret Key (Step 2)
- Object Storage bucket path (Step 3)
- CLOVA Speech domain Secret Key / Invoke URL (Step 6)
The similarly-structured parent messaging feature can take one to two weeks to set up, since it depends on KakaoTalk and telecom review. Call transcription is different — because NCP signup completes instantly, you can start and finish setup the same day.